
AI is one of the most complicated tasks a programmer has to deal with when developing a game. You have to take almost everything into consideration when programming your game’s AI as they will have to interact and react to many situations on their own, its like programming a custom brain! Today I’m gonna get into some very basic elements of AI and how you can implement a reasonably functional system without too much effort.
To follow this tutorial, you should be familiar with the basics Unity and I will personally be using Unity 5, which should translate over to 4 without issue. I won’t be getting into animation or anything like that, we’ll be testing this AI with cubes and a plane as a platform.
So create a new project and lets start by setting up our scene. Lets create a plane and two cubes, pretty basic just go to Game Object->3D Object->Plane and then Game Object->3D Object->Cube. Separate your cubes a bit if they’re on top of each other and you should have a basic scene that looks like this:
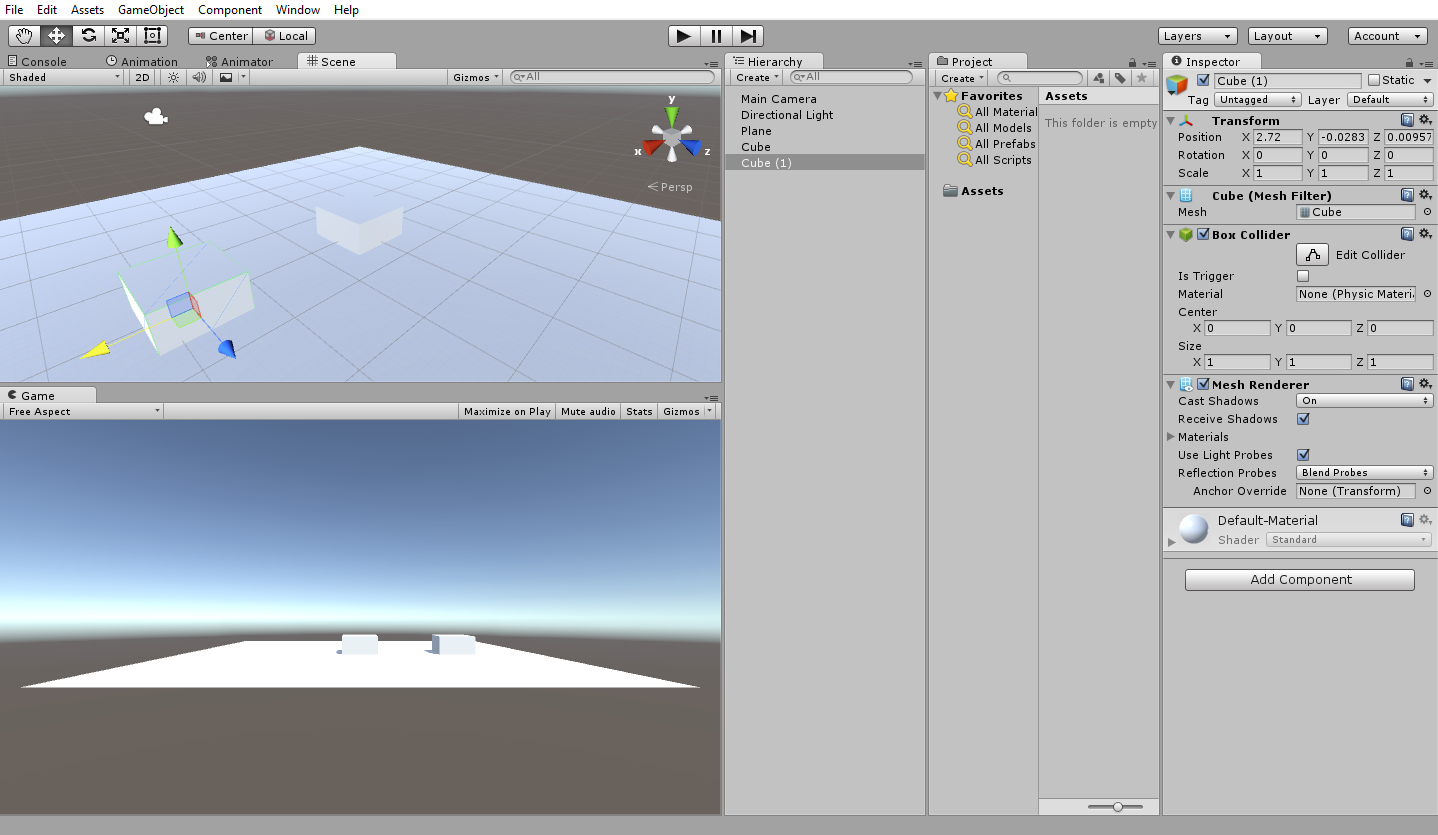
Alright so these two cubes will act as our player and our enemy. What would be the first thing an enemy should be doing? Well he should be looking for our player before attacking. What we’re going to do next is give the enemy a sense of sight so when the player comes into range then the enemy can react.
There are so many ways to give an enemy vision programmatically but we’re gonna be taking the easy road here. Ours will be using a collider as its sight, some games might prefer their AI use Ray-Casting as a way to sense distance but that is not necessary for our basic AI.
In order to represent sight, we’re going to use a trigger collider on the enemy. But what collider is appropriate to use in this situation? I say you use whatever you prefer but we can do this in several ways. We could use a capsule to have a very forward narrow sight, a sphere to cover a wider distance, or even a cube if you wanted essentially no peripheral vision. I’m going to use a sphere here but you could use any one of the three.
Before we create these objects I am gonna go ahead and name my cubes so we can tell the difference between them. Name one cube Player and the other Enemy. Now let’s create our sphere collider or whatever collider you chose as your method for sight. With the Enemy selected, go to add component in the inspector panel and simply hit physics->sphere collider to add it.
The first thing you want to do here is increase our colliders radius, make it as large as you want our enemy’s sight to be but I inputed 5 as my radius. You might have to scale the Plane a bit to give our cube’s more room. Then, position the sphere collider to start barely behind our enemy or wherever you want the vision to start. If you set your radius to 5, then you can just set the Center Z axis to 4.5 to get yours to look like mine. Your scene should look something like this:
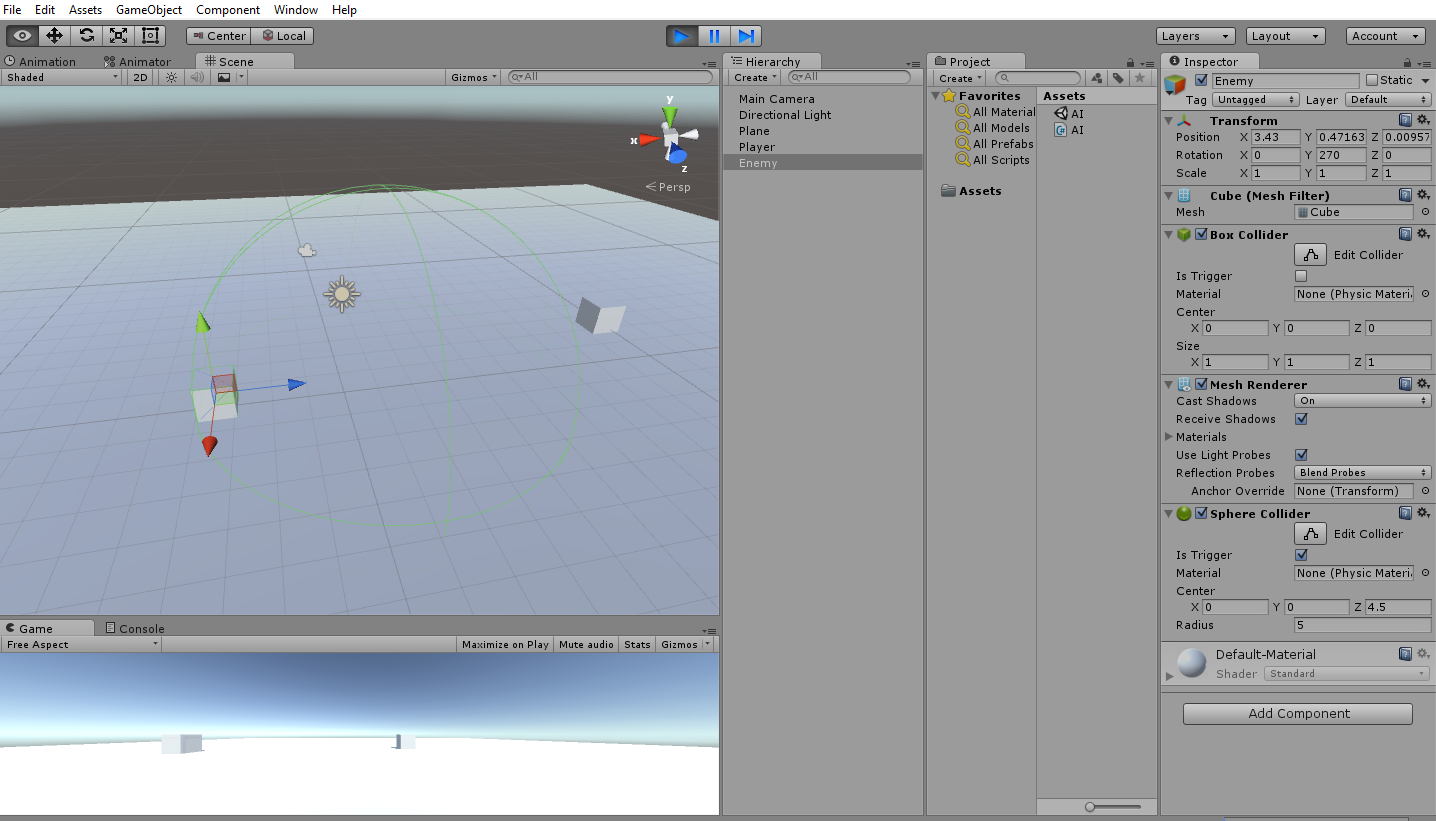
Notice I have also checked the “Is Trigger” button under the Sphere Collider in the Inspector panel. Make sure you do this as we don’t want our sphere collider to actually collide into the player, we want the player to be able to walk into the radius.
So we got our scene all set up which means it’s time for the hard part, scripting! First go ahead and create a C# script and call it whatever you like. I called mine AI, open up the script and you should see the default start and update functions. Above start were gonna go ahead and create a float called speed which will control the speed of the AI character, give it any value you wish but for now I went with 5.
using UnityEngine;
using System.Collections;
public class AI : MonoBehaviour

public float speed = 5;

// Use this for initialization
 void Start () {

 }

 // Update is called once per frame
 void Update () {

 }
}
This is how our script should look so far. Anytime you use a public float, it means you will be able to edit the value of it in-engine. This is useful for testing purposes and for values that will be frequently changed to your own preferences.
Now we need to create a variable for our player. There are several ways to do this, we could do it with tags but since we only have one specific target for the AI we’ll just create a public transform. Under speed, type public Transform player; This will basically be our handle for the player which we will specify in the actual game engine.
Next we’ll write some code to handle the player entering the the space of the AI. All were saying here is when the player enters and stays within our Aggro Radius, then go ahead and chase the player until they exit the Enemy’s range. Type out the following code after the Start() function:
void OnTriggerStay(Collider hit)
{

if(hit.transform == player)
{
     if(player == null)
     {
          return;
     }
     transform.position = Vector3.MoveTowards(transform.position,
                          player.position, speed * Time.deltaTime);
     transform.LookAt(player);
}
Please type this out yourself and don’t copy and paste, actually typing things out will help you remember how to this yourself once you’ve done it enough times. So lets break this down, the first thing you did was write out a function called OnTriggerStay. This function is an in-engine function so it isn’t custom created by us, what happens here is the function is looking for a collider which we call “hit”. Our collider is the trigger sphere we created earlier, so when our player comes within range then do something and in this case were telling our cube to simply move towards and look at the player.
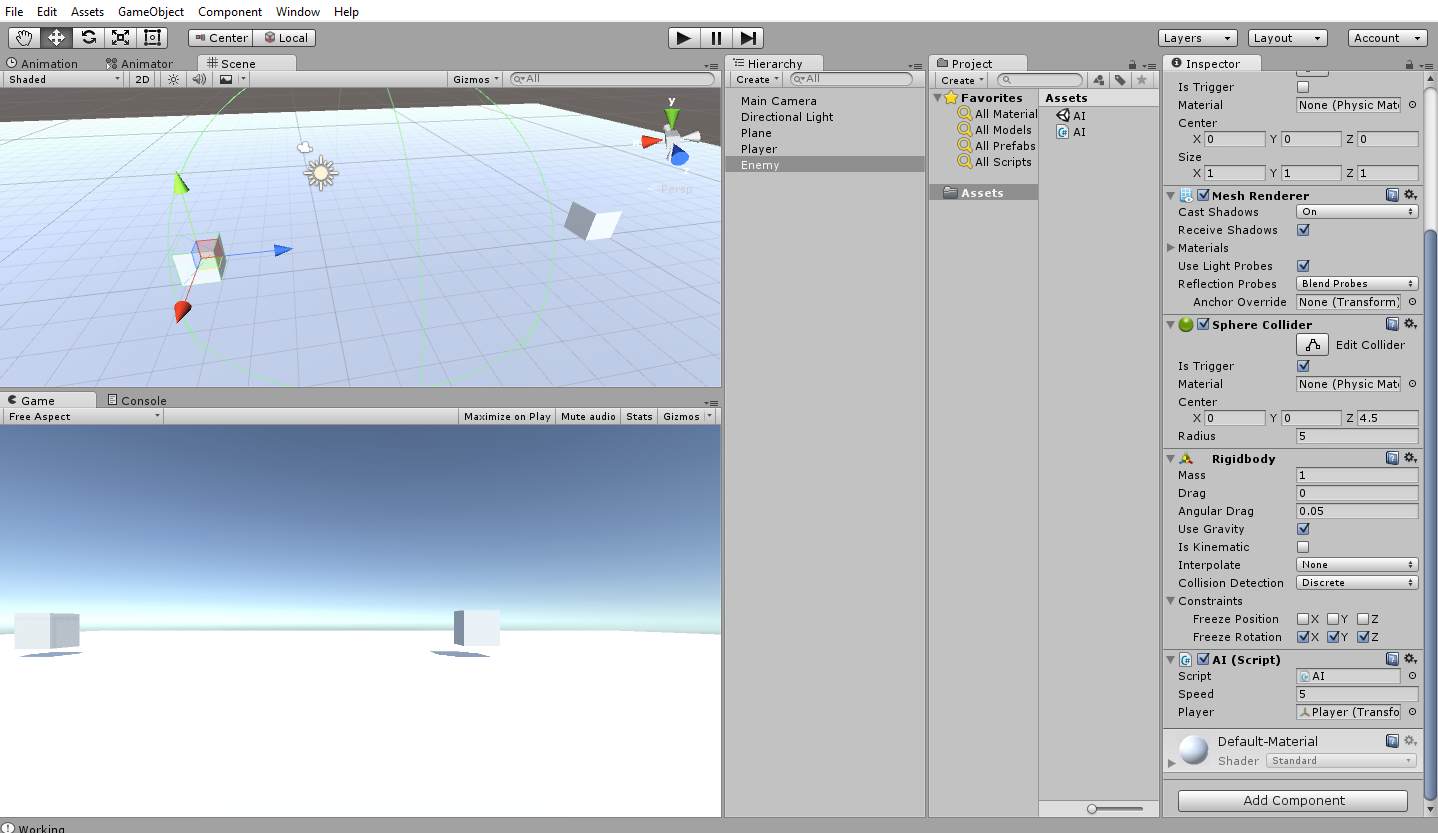
Now lets set this up for testing! First, lets give our cubes some physics so proper collision detection can happen. Go back into the engine and add rigidbody’s to both our player and our enemy. This can be done by clicking on them in the hierarchy, then in the inspector go to add component->physics->rigidbody. In the inspector make sure to freeze the rotation of each rigidbody on its x, y, and z constraints so our characters don’t rotate strangely when moving.
Next add the AI script to the enemy by dragging and dropping it onto the Enemy in the Hierarchy. Now drag our Player from the hierarchy into the Player slot on the AI script in the inspector to let the Enemy know what object it should be looking for. Your scene should look like this:
If you want to test this early, you can press the play button and simply move our Player into our Enemy’s radius, you’ll notice the Enemy will start chasing him. If the Enemy feels too fast, then set its speed to a lower value and vice-versa if he feels too slow. After testing this, you’ll notice that the Enemy will push the Player if he actually collides with him. We don’t want this to happen at all, we simply want the Enemy to stop in front of the player when he has reached a close enough range to initiate combat.
So go back into the script editor as we need to add some code to find the distance between them. This is pretty simple, all we’re gonna do is check to see if we’re within a certain distance and do nothing if we are. Type the following highlighted lines of code out in your script editor:
void OnTriggerStay(Collider hit)
{

if(hit.transform == player)
{
     if(player == null)
     {
          return;
     }

     if(Vector3.Distance(transform.position, player.position) <= 2)
     {
          return;
     }

     transform.position = Vector3.MoveTowards(transform.position,
                          player.position, speed * Time.deltaTime);
     transform.LookAt(player);
}
Now the Enemy will stop in place when he is within a short range. Usually in this part of the code we would run a combat function as the player is within range for it but we’re not getting into combat until a later tutorial, for now just understand that combat would happen at this point in the code if we had it in our game.
The final thing to do is have our Enemy return to his original position when our Player runs out of range. In most games, when the Player runs too far the Enemy will lose interest and return to where he was originally. This is gonna require some math to store and calculate distances and it can be done in many ways. I will try to keep it clean and simple but if you’re not familiar with math in a 3D space or are new to programming than you’re probably not going to fully understand this your first time doing it. That’s fine though, practice is the best way to learn and if you type it out yourself every time you program then you will eventually get it.
So two important variables we will be learning and using here are Vectors and Quaternions. In this application, a vector is going to be a point in a 3D space and will be used to calculate position in-game. A quaternion is used to represent rotations, here we will be using it to rotate our Enemy back into his original position. Basically when our Enemy is returning to his original position, it would look really weird if he was just walking backwards and when he got there just stared in whatever direction he was facing.
Lets go back into the script editor so we can create some variables. Earlier we made some public variables, here we don’t want to edit them in engine so we’re going to create three private variables which are as follows:
public float speed = 5;
public Transform player;

private Vector3 origPosition;
private Quaternion origRotation;
private bool target;
We want to store the original position and rotation of our Enemy so we can return to it after our Player gets away. Now we need to assign these values in the Start() function which you should already have in your script. Basically we want the starting position of wherever you set your enemy to be recorded for later and here is how we do that:
 // Use this for initialization
 void Start () {
      origPosition = transform.position;
      origRotation = transform.rotation;
      target = false;
 }
It’s fairly simple, for those who might be unfamiliar a bool (boolean) is a very simple variable that only takes two arguments, true or false. We can use it like a light switch and turn it on or off whenever we like. Okay let’s move on!
We’re only gonna add one line of code into our OnTriggerStay function for now:
void OnTriggerStay(Collider hit)
{

     if(hit.transform == player)
     {
          if(player == null)
          {
               return;
          }

          if(Vector3.Distance(transform.position, player.position) <= 2)
          {
               return;
          }
          transform.position = Vector3.MoveTowards(transform.position,
               player.position, speed * Time.deltaTime);
          transform.LookAt(player);
          target = true;

     }
}
So when this block of code is run were just gonna set the target to true as our Enemy will currently have a target to chase which is our Player.
Now what about when the player is out of range? Well we’re going to create another pre-defined function called OnTriggerExit(), this can go under our OnTriggerStay() function. This will be called every time something leaves our trigger’s range. One major difference is this function is called only once, so we can’t put code in here to handle any kind of movement or anything that need’s constant updating. But here is what we will be putting in here:
void OnTriggerExit(Collider Other)
 {
     if(Other.transform == player)
     {
          target = false;
          transform.LookAt(origPosition);
     }
 }
So when our player variable leaves the trigger, we’re going to set our target to false and then have our enemy look towards his original position. The next thing we have to do is check where our enemy currently is and move him towards his original position. This is going to involve some math and some complicated commands but don’t worry if you don’t fully understand it yet. In our already made Update() function, type out the following:
// Update is called once per frame
void Update () {

     if(Vector3.Distance(transform.position, origPosition) > 0.1f
          && target == false)
     {
          transform.position = Vector3.MoveTowards(transform.position,
               new Vector3(origPosition.x, transform.position.y,
               origPosition.z), speed * Time.deltaTime);
     }
     if(transform.position.x == origPosition.x
          && transform.position.z == origPosition.z)
     {
          transform.rotation = Quaternion.RotateTowards(transform.rotation,               origRotation, 50f * Time.deltaTime);
}
If you understand all that then congratulations you probably didn’t need to read all of this! So let me break this down a bit, we start out by asking is our Enemy’s current position not where he started and our we currently not targeting the Player? If all those conditions are met, then we’re going to start heading back to our original position. One thing to take note of is we’re not trying to go back to our original position on the Y axis. If your enemy was set up to start a little bit above the ground, then you don’t want him to keep attempting to go back to it’s Y position as you want him to stay flat on our plane.
Next we provide some code for when our Enemy arrives back to his original position on both the X and Z axis. When those conditions are met, and they have to be met exactly, our Enemy will start rotating back to his original state. This way he can go back to facing forward and isn’t facing some random direction.
And that’s it! This tutorial will not be covering player movement. I’m here to teach you AI and there are a million tutorials on player input and movement. So if you need some Player movement as well then please look it up in google as there are a whole lot of resources on the subject.
Below I’m going to include all of the code used in our AI script in case you skipped something or were confused somewhere along the way. Thanks for checking out my Tutorial and check back soon for the next one related to AI!
Follow me on twitter @jerryludus to get the latest updates on future tutorials.
using UnityEngine;
using System.Collections;

public class AI : MonoBehaviour {
     public float speed = 5;
     public Transform player;

     private Vector3 origPosition;
     private Quaternion origRotation;
     private bool target;

     // Use this for initialization
     void Start () {
          origPosition = transform.position;
          origRotation = transform.rotation;
          target = false;
     }
     void OnTriggerStay(Collider hit)
     {
          if(hit.transform == player)
          {
               if(player == null)
               {
                    return;
               }
               if(Vector3.Distance(transform.position, player.position)
                    <= 2)
               {
                    return;
               }
               transform.position = Vector3.MoveTowards(transform.position,
                    player.position, speed * Time.deltaTime);
                    transform.LookAt(player);
               target = true;
          }
     }
     void OnTriggerExit(Collider Other)
     {
         if(Other.transform == player)
         {
               target = false;
               transform.LookAt(origPosition);
          }
     }

     // Update is called once per frame
     void Update () {
          if(Vector3.Distance(transform.position, origPosition) > 0.1f
               && target == false)
          {
               transform.position = Vector3.MoveTowards(transform.position,                    new Vector3(origPosition.x, transform.position.y,
                    origPosition.z), speed *     Time.deltaTime);
          }
          if(transform.position.x == origPosition.x
                && transform.position.z == origPosition.z)
          {
               transform.rotation = Quaternion.RotateTowards
                    (transform.rotation, origRotation,
                    50f * Time.deltaTime);
          }
     }
}

Great introduction for beginners, good job!
LikeLike